You use Smart GeoFill to alter aspects in your imagery, such as copying features or terrain elements, or filling an area of interest with content from an overlapping image to replace an unwanted aspect.
You can choose from various sources to copy from, and you can apply the copied or fill pixels to the active image or another image altogether.
- Copy
- Fill
You then draw a polygon to specify the area of the image you want. Alternatively, you can use an existing selected vector polygon.
In Copy mode, Smart GeoFill copies the pixels inside the polygon you have drawn (or selected), which you can then paste to suit. You can, if necessary, drag the polygon to a new location, perhaps to duplicate or obscure a feature, and then paste the copied pixels. You can also paste the pixels in another image. For example, when working with a mosaic, you can use Smart GeoFill to replace clouds in an area of interest (AOI) with cloud-free pixels from images that overlap the same area.

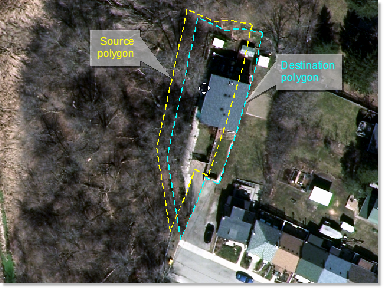
In Fill mode, Smart GeoFill uses the concept of source and destination polygons. That is, you draw a polygon, primarily, to define the area you want to fill. This polygon is then designated as the destination polygon.
You then drag the polygon, which creates a source polygon of the same shape while retaining the destination polygon. Drag the source polygon to the area of the image you want to use to fill the destination polygon. The pixels in the destination polygon are updated in real time to display the contents of the source polygon as you drag it.
- Output
- Custom File Set
- Project File Set
- DEM Ortho Preview
With Output selected, you can copy pixels from the active file; typically, this is the image you are working on. That is, the input file and the output are the same.
With Custom File Set selected, you can add any number of files you want, from any folder, and then copy pixels from any of the images. You can constrain the files to only those that overlap the AOI; that is, the area inside the polygon.
For more information about working with a custom file set, see Using a custom file set.
Project File Set works similarly to Custom File Set, except that it is limited to those files that exist in your active Focusproject.
For more information about working with a project file set, see Using a project file set.
When you are editing a digital elevation model (DEM), and you have the Full Res. Ortho Preview window open, the Source list in the Smart GeoFill window includes an additional entry, DEM Ortho Preview. When you select this entry, you can read pixels from the regenerated orthos, and then paste the copied pixels to the destination, as applicable.
That is, in the DEM Editing window, you can open the Smart GeoFill window and copy pixels when previewing an updated orthorectified image in the Full Res. Ortho Preview window. While previewing, you can see aspects of the ortho image that display a particular feature of interest, such as a bridge or an overpass. You can use Smart GeoFill to copy the feature, or use that feature to fill an AOI in your mosaic.
For more information about using Smart GeoFill with a DEM, see Repairing cloud interference in a DEM and Copying from the Full Res. Ortho Preview window. For information on previewing a full-resolution orthorectification, see Using the Full Res. Ortho Preview window.
If necessary, you can adjust the color balance or correct the exposure levels of the copied pixels to match appropriately with the destination.
For more information about Smart GeoFill, see: