At times, you may want to control the blending of the pixels to be pasted. That is, by using an exclusion mask, you can control the pixels to which you want to apply the blending.
The value you enter in the Blend width box applies to all pixels from the polygon out to the specified width. New pixel values for the width are computed by combining the original with the copied values. However, at times you may not want the blend to apply to all edges of the polygon. It is in this scenario that you can use an exclusion mask to select an area in which no blending will occur.
Figure 1. Blend Exclusion Mask

To blend with an exclusion mask
- In the viewer, draw or select the polygon with which you want to use an exclusion mask for the blend on an edge.
-
In the Smart GeoFill window, select the Blend width check box, and then type or select the width you want in the box to the right.
In the following figure, a blend width of 15 pixels is entered.
- On the toolbar, click Blend Exclusion Mask
-
Draw a new polygon around the pixels you want to exclude from the blend.
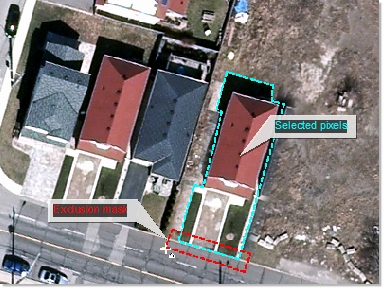
In the preceding figure, the blend is excluded from the vector paralleling the street, but the other vectors of the polygon retain the defined blend width.