
When running through a workflow on a large project, the same function may need to be applied to multiple images. Creating a batch workflow script helps to automate this process.
This tutorial outlines how to search through folders of images and apply a batch process to them using the CATALYST Professional Python API. In this case, each image will be pansharpened; however, the same batch processing method can be applied to many other workflows.
To learn more about how to use Python with CATALYST Professional, see the Getting Started With Geomatica and Python tutorial

To demonstrate how to run a batch workflow script, multiple folders containing Landsat-8 images will be iterated through. Each of these images will be pansharpened and then saved into a new output folder.
The datasets and full script required for this tutorial can be found here.
Extract the files and folders from this zip file to your computer. Once the folders and files have been extracted from the zip package, the predefined directory structure should be kept.
The first step in this workflow is to import the required modules and set the working and output directories.
Lines 1, 2, and 3 in the code below import the algo function, which calls all CATALYST PCI functions and exceptions.
Line 4 imports the built-in Python os module. This module is used to access the operating system’s file structure to create new directories and iterate through current directories. The final module, fnmatch, is used to find files within the input directory that are Landsat-8 images.
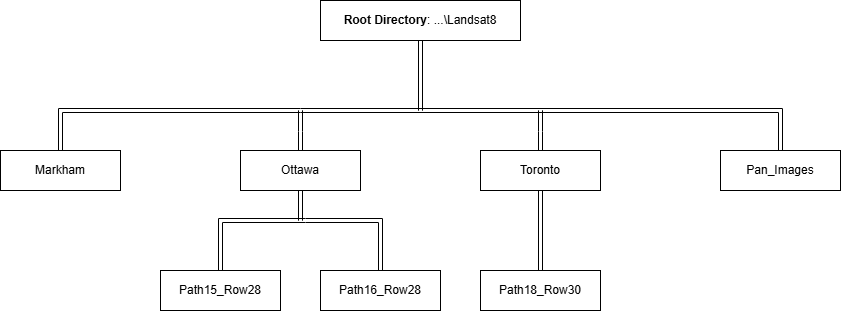
The working directory, working_dir, will be set to the folder that includes all the raw Landsat-8 images. This folder can also include other folders. The tutorial data package has the following file structure:

Line 9 sets output_dir to the location where you will save your output pansharpened images. In this variable definition, os.path.join() is used to create a new pathname string that combines the previous pathname working_dir with a new folder name 'Pan_Images'. The module os.path.isdir() is used to check if output_dir is currently an existing directory. If it does exist, line 12 is skipped. If it does not exist, then the line will be executed, creating a new output_dir directory with the module os.mkdir(). The first time the script is run, the folder Pan_Images is added to the Landsat8 folder (working_dir).
1   import pci
2   from pci.pansharp import *
3   from pci.exceptions import PCIException
4   import os
5   import fnmatch
6
7   # Set the working & output directories
8   working_dir = r"H:\Batch_Processing_Pansharp_Tutorial\Landsat8"
9   output_dir = os.path.join(working_dir, "Pan_Images")
10
11  if not os.path.isdir(output_dir):
12      os.mkdir(output_dir)
13To navigate through all of the files within working_dir, a list of all valid files needs to be generated.
Before the list of all valid files is created, an empty list needs to be initiated. Line 14 creates an empty list, input_files, which will be populated with all valid filenames. Line 16 starts the for loop, which searches through a directory and its sub-directories for any files. Three variables are extracted by the module os.walk(), r, d and f, where:
r = main directory,d = any sub-directories, andf = the file names within r.During the first iteration of the loop, r is working_dir (\Landsat8), d includes the three sub-folders (\Markham, \Ottawa, and \Toronto), and f is the list of files that are directly within working_dir (that is, not in the sub-folders). On the next iteration, the first subfolder (\Markham) is searched and f changes to become the list of files within that subfolder.
On line 17, a nested for loop is created. In this loop, each file in f is filtered depending on the file extension. In the case of this tutorial, the ending of the raw Landsat-8 key file, *_MTL.txt, is the filter clause. This means that only files that end in _MTL.txt will be added to the input_files list.
On line 18, the filename that matches the filter is joined with the directory (r) that is currently being searched. This new pathname is appended to the input_files list.
14  input_files = []
15
16  for r, d, f in os.walk(working_dir):
17      for file in fnmatch.filter(f, '*_MTL.txt'):
18          input_files.append(os.path.join(r, file))
19Now that the full pathnames of all the valid _MTL.txt files are in a list, the input_files list can be iterated through, and the CATALYST pansharpening algorithm, PANSHARP, can be run. This algorithm will be individually run on each image within input_files.
PANSHARP should be run within a try and except statement. This ensures that if one iteration fails, the entire script will not stop running. Instead, an error will be printed for the failed iteration, and then the program will continue to process the next image in the list. Learn more about CATALYST's Exceptions module.
Lines 23 and 24 use ‘-’.join() to join the string ‘MS’ and 'PAN' to the image filename (from input_files) using a dash (-). For example, a filename of \Landsat8\Markham\LC80180302014247LGN00_MTL.txt becomes \Landsat8\Markham\LC80180302014247LGN00_MTL.txt-MS and \Landsat8\Markham\LC80180302014247LGN00_MTL.txt-PAN.
Here, the MS bands are used as the input file, fili. Line 24 uses the PAN band as the input panchromatic file, fili_pan.
Finally, lines 25 - 27 set the output file. An example of creating an output pathname and filename is described below.
Assuming that PANSHARP is run on the image: \Landsat8\Markham\LC80180302014247LGN00_MTL.txt
The code for the output file in lines 25 - 27 is broken up into four parts:

output_dir - \Landsat8\Markham\LC80180302014247LGN00.pixAdditionally, a print statement can be added between lines 21 & 22 to check the current image being processed using print(image).
20  # Iterate through list of files and run function
21  for image in input_files:
22      try:
23          pansharp(fili='-'.join([image, 'MS']),
24                   fili_pan='-'.join([image, 'PAN']),
25                   filo=os.path.join(output_dir,
26                                     '.'.join([os.path.basename(image).split('_MTL')[0],
27                                               'pix'])))
28
29      except PCIException as e:
30          print('\n*** PCIException: {}'.format(e))
31
32      except Exception as e:
33          print('\n*** Exception: {}'.format(e))
The script is now ready to run. It will iterate through all folders of the working directory and save each pansharpened image to the output folder. Using the tutorial datasets, there will be four pansharpened images in total: 1 from Markham, 2 from Ottawa, and 1 from Toronto.
The folder structure after the batch process will look like this:
| LC80150282013111LGN01.pix (Ottawa) | LC80160282013118LGN02.pix (Ottawa) |
 |  |
| LC80180302014247LGN00.pix (Markham) | LC80180302015234LGN00.pix (Toronto) |
 |  |