The purpose of this tutorial is to familiarize you with the CATALYST Professional Toolbar, as well as the visualization of data while using Focus.
All of the data utilized within this tutorial is available for download on our website:
Once the data installation is complete, the default location will be:
To start CATALYST Professional, you may select either of the following steps:
When you start Professional using the desktop icon, the CATALYST Professional Toolbar opens and Focus starts automatically. All CATALYST Professional applications can be started either from the toolbar itself or through the Start menu.
The CATALYST Professional Toolbar provides access to all Professional programs.

Figure 1 - The CATALYST Professional Toolbar
Each icon (button) on the toolbar will provide access to a specific Professional program. These can also be run separately through the Start menu. Below is a breakdown of the specific programs that are accessed through each button:
| Name | Description | Icon |
| Focus | Focus is the main data visualization environment in CATALYST Professional. Focus includes geospatial processing algorithms, data capture functionality, and information extraction and analysis tools. | |
| OrthoEngine | OrthoEngine is a complete photogrammetry environment, offering geometric correction, orthorectification, mosaicking, and DEM extraction functionality, as well as 3-D visualization and data extraction environments. |  |
| Mosaic Tool | The Mosaic Tool provides low-resolution representations of all of the images that will be included in the output mosaic. Here, you create high-quality mosaics, review, edit, and modify individual images. | |
| Modeler | Modeler is a visual scripting environment that provides an interactive methodology for developing, automating, and batch-processing both simple and complex workflows. |  |
| EASI | EASI is a command-line-based scripting environment that provides workflow development as well as customization functionality. | |
| Chip Manager | The Chip Manager lets you create and manage image chip libraries that are used as ground controls in orthorectification workflows. | |
| FLY! | FLY! is a visualization tool that renders perspective scenes and interactive ‘fly-throughs’ by using imagery and elevation information. | |
| SAR Polarimetry Target Analysis | SAR Polarimetry Target Analysis (SPTA) lets you load a polarimetric SAR data set, choose a target selection mode, apply coherent decomposition, and display and save information about a data set in numerical and graphical order. | |
| Historical Airphoto Processing | Historical Airphoto Processing (HAP) is a customized software program that automates the correction of historical imagery. You can properly prepare historical data and set up workflows to create high-quality mosaics that are aligned and orthorectified perfectly. | |
| Commuter License Utility | This utility is used to check out a commuter license from the license server. | |
| CATALYST Earth Website | Allows users access to the CATALYST Earth Webpage, where you may learn additional information about various offerings from CATALYST. | |
| Toggle | By selecting the button, the CATALYST Professional Toolbar switches from Landscape to Portrait. | |
| Help | Provides users with access to online help where they can learn about specific algorithms or terms included within CATALYST Professional. | |
| Exit | Closes the CATALYST Professional Toolbar. |
When CATALYST Professional is started, Focus will start automatically. The following illustration shows the basic components of the Focus interface.

Figure 2 – Focus Interface
A. Maps and Files Tab B. Menu bar C. Work area D. Toolbar E. View area F. Status bar G. Overview window
CATALYST Professional Focus is designed to work with geospatial data in more than 100 data formats through PCI Geomatics Generic Database (GDB) technology. This format flexibility, combined with a suite of easy-to-use viewing tools, makes Focus the perfect environment for viewing spatial data.
A major strength of Focus is its ability to easily view and navigate databases. This section will show you how to open and view image layers, vectors, and attribute data in Focus.
With CATALYST Professional Focus started, you are ready to add data.
To open an image file in Focus:
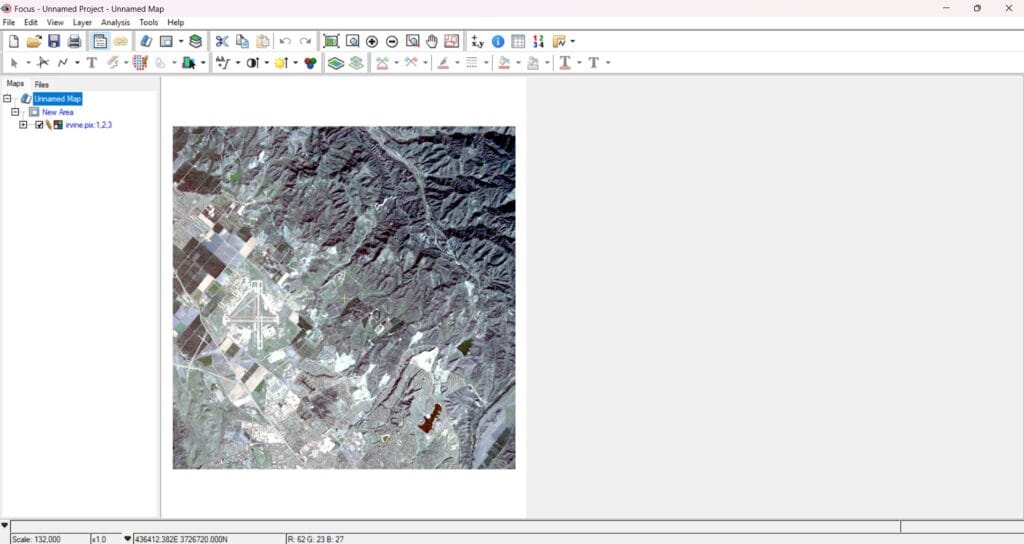
Figure 3 - The irvine.pix image in the Focus View area
When a file is loaded into Focus, a default layer is presented in the viewer and listed in the Maps tree. All other layers contained in the same file are listed in the Files tree. It is possible to load any of these layers into the viewer and the Maps tree.
To add a layer to the Maps tree:
In Focus, the Maps tree displays all data layers contained in the View area. You can show or hide the items from the View area by clicking or clearing the check box in the Maps tree next to the item. You can also change the display priority of a layer by dragging it up or down the Maps tree.
To move a layer in the Maps tree:
Attributes are characteristics of geographic features typically stored in tabular format. In Focus, attributes can be viewed and edited using the Attribute Manager.
To open the Attribute Manager:
Two attributes are included in the transportation layer. ShapeID is a shape identifier, and Attribute is a code indicating road class for each vector segment.
When viewing data in Focus, it is important to be able to navigate the data effectively. The Zoom and Pan tools allow you to do this quickly and easily.

Figure 4 - Focus Zoom and Pan tools
There are several ways to zoom an image in the Focus viewer. The following Zoom tools are located on the Focus toolbar:
To zoom in on an image feature:
The Pan tool ![]() is available when the View area is not at an overview magnification.
is available when the View area is not at an overview magnification.
To pan an image:
The Focus toolbar includes commands for quickly enhancing and adjusting the appearance of your images. These enhancements include contrast and brightness adjustments.

Figure 5 - The Focus image Enhancements, Contrast, and Brightness buttons
The standard Focus image enhancements are Linear, Root, Adaptive, Equalize, and Infrequency. Image enhancements can be automatically applied using the Enhancements menu.
To apply an enhancement to an image layer:
Interpreting image data is often made easier by adjusting the image contrast and brightness.
To increase or decrease the image contrast or brightness: