CATALYST OrgAdmin is a web-based admin tool/application that allows a designated organization licensing administrator (OrgAdmin) to create, set up and manage users, as well as have visibility of the organization's licenses and can control access to those licenses. This guide is intended to assist an OrgAdmin in understanding how basic tasks in the system can be carried out on the centralized OrgAdmin Dashboard.
The left-hand Navigation Menu of the dashboard includes 5 main sections:
Dashboard
User Groups
Users
Invitations
Licenses
The profile information/page of the logged-in OrgAdmin is accessed in the top-right corner. When the profile icon is clicked, a dropdown with 2 options is shown:
My Profile
Logout
1. Dashboard
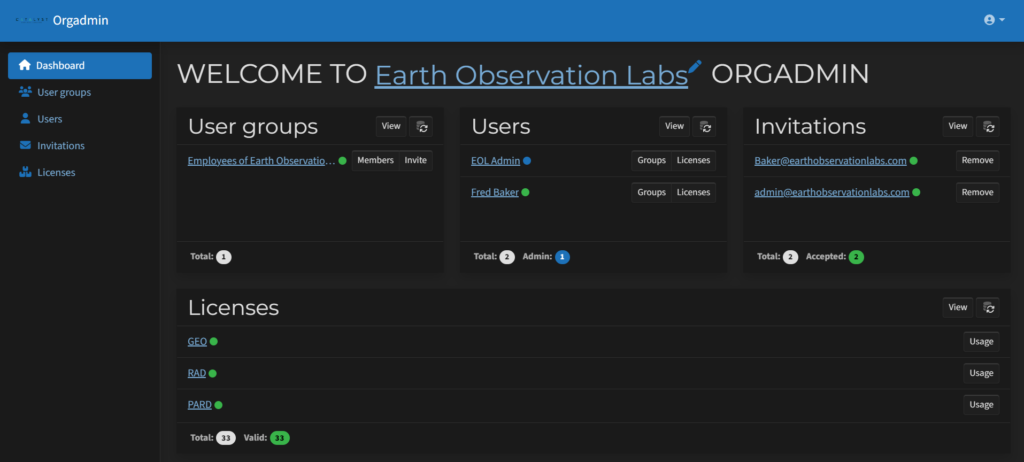
After successfully signing in to the OrgAdmin webpage, the OrgAdmin will land on the Dashboard, which displays an overview/summary of the main sections of the applications.
The Dashboard has four sections displayed that link to the sections on the side panel - User groups, Users, Invitations, and Licenses.
1.1. Dashboard View - Groups
This section on the dashboard displays the three most recent groups, as well as the total number of groups. You can reload the database to update the view. For each of the listed groups, you can:
See the status indicators showing information about the group type. These are the coloured circles beside the group name:
Green = Employees group
Blue = License consumers group
Grey = Custom group
Select the option to view its members through the Members button. A dialogue will appear showing all organization users, and the users in the group will be selected.
Select the option to invite a user to the group through the Invite button.
1.2. Dashboard View - Users
In this section on the dashboard, you can:
Select View to navigate to the Users section to see all users.
Select Reload data to reload data from the database.
The 3 most recent users will be listed. For each of the listed users, you can:
See the status indicators (colored circles alongside the username) that show information about the user activity:
Green - Active user
Amber - Inactive user (users that have not logged in for >30 days)
Blue - Admin (users that can access OrgAdmin)
Select the option to view the Groups the user belongs to. A dialogue will appear showing you all the organization’s groups. The groups the user belongs to show as selected. You can find more information about the Groups page in the User Groups section of this tutorial.
Select the option to view the Licenses the user has access to. A dialogue will appear showing you all the licenses that are available for the selected user. You can find more information about the Licenses page on the Licenses section of this tutorial.
View the total numbers for all users, inactive users and admin users.
1.3. Dashboard View - Invitations
In this section on the dashboard, you can:
Select View to navigate to the Invitations section to see all invitations.
Select Reload data to reload data from the database.
A set of up to 3 invitations will be listed. For each of the listed invitations, you can:
See the status indicators (colored circles alongside the username) show information about the invitation status:
Green - Accepted
Grey - Pending (Invitation was not accepted by the user)
Amber - Unsent (invitations that were not sent due to some technical issues)
Red - Declined (declined by user)
Select the option to Resend the invitation to the user. A dialogue will appear requesting you to confirm the invitation resend.
Select the option to Remove the invitation to the user. A dialogue will appear requesting you to confirm the invitation removal.
View the total numbers for all invitations, Accepted and Pending.
1.4. Dashboard View - Licenses
In this section on the dashboard, you can:
Select View to navigate to the Licenses section to see all Licenses.
Select Reload data to reload data from the database.
A set of up to 3 Licenses will be listed. For each of the listed licenses, you can:
See the status indicators (colored circles alongside the license item name) that show information about license status. Tooltips can be used for more information about license.
Green - Valid license
Amber - Expiring License (the expiration date is within 7 days) - amber
Red - Invalid (Expired license) & Deactivated licenses
Select the Usage option to see license usage and manage the license. A dialogue will appear that includes all users associated with the organization. You can find more information about the license’s usage in the Licenses section.
View the total numbers for all licenses, Invalid, Expiring, Deactivated and Valid licenses
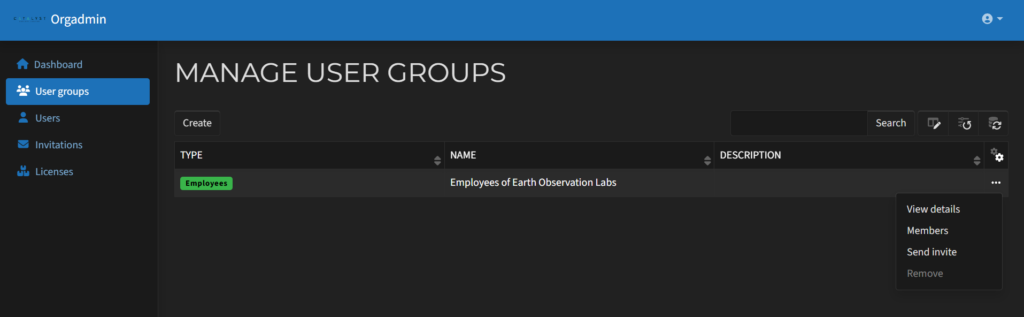
2. User Groups
The User Groups section provides access to view and manage the current user groups on the organization's account. A table containing the Type, Name, Description and Tools (the range of possible actions you can apply to the existing Group) for the groups is displayed.
The tool options include:
View details - to see more information on the group
Members - to view the members belonging to that group
Send invite - to add/invite users to that group
Remove - to remove the group
The top table navigation includes:
Create button
Search window
Select Columns to display button
Reset defaults button
Reload data button
The following actions can be done through this page's menus:
Create a group
Manage group details and entitlements
Remove group
Manage group members
Invite members to a group
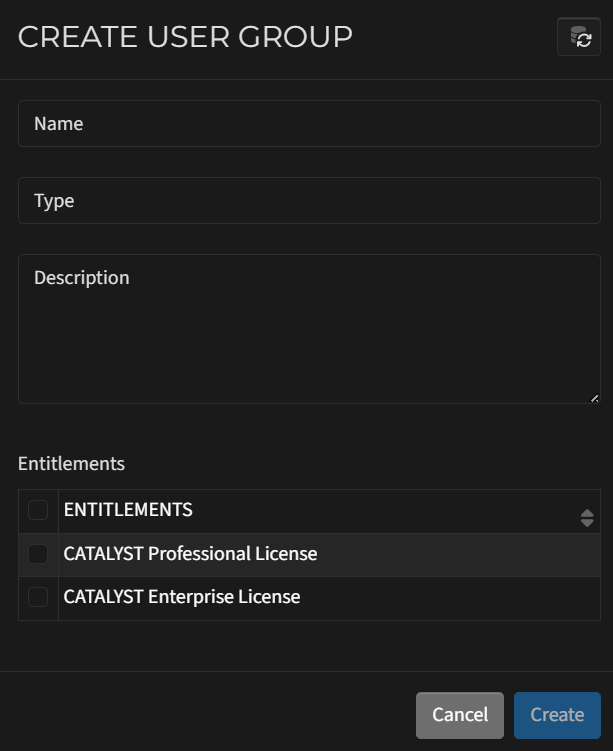
2.1. Creating A Group
To create a group:
Navigate to the Group Section.
Select the Сreate button.
Enter a name in the Name field.
Enter a type in the Type field - a tag to identify the audience, which allows building default logic on membership per group type. It can be:
Employees - denotes a group type formed of an organization’s employees with built-in default authorization logic. There is only one group associated with this type that can exist. This logic includes the built-in role Organization Member to activate on users connected with an organization via the employees group. It is an efficient way of applying default authorization rules without user-specific management.
LicenseConsumers - denotes a group type which will be able to consume licenses from an organization's entitlement. No logic is enforced based on this group type, and it is provided as an example way of grouping users that may be external to an organization but are allowed to consume licenses that the organization owns.
Custom values can also be defined to denote group types created by an administrator that have meaning in a specific business case and should be used to assist with business logic in specific customer cases.
Enter a brief description of the group in the Description field.
Select one or several entitlements from the list available for the organization. An entitlement is a container for licenses. An organization can have one or more entitlements. After you select the entitlements, all licenses that are part of them will be available for the group's members.
Click Create.
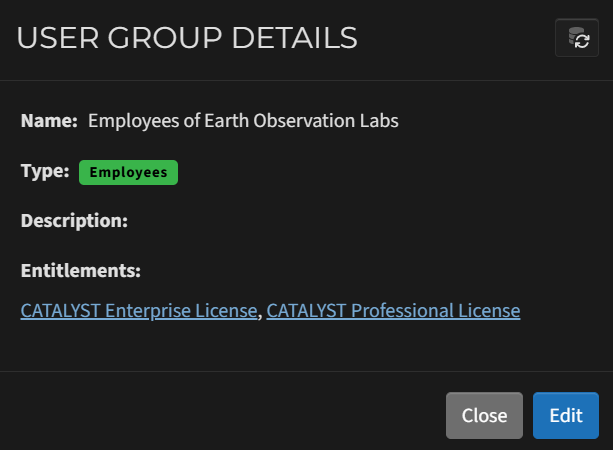
2.2. Managing Group Details And Entitlements
To manage Group details and entitlements:
In the User Groups section, select a group and click on the three-dot menu from the Tools column.
In the User Groups section, select a group and click on the three-dot menu from the Tools column.
Select View Details to see further information about the selected group.
In the User Group Details panel that opens, the following can be viewed and managed by clicking the Edit button:
Name (editable)
Type (partially editable)
Note: The Employees group type cannot be changed.
Description (editable)
Entitlements (editable)
This shows the list of available entitlements for the Organization
The OrgAdmin can enable/disable available entitlements for the group by selecting/deselecting it on this dialogue
Each entitlement can be expanded by clicking on the entitlement name to reveal entitlement details
Name
Consuming groups
Assigned licenses
2.3. Removing A Group
To remove a group:
Select a group from the table in the User Groups section and click on the three-dot menu from the Tools column.
Select Remove.
Confirm the removal.
Notes:
A group with the Employee type can not be deleted. This action will be displayed as inactive for a group of this type.
The OrgAdmin users can remove a user from their organization by removing the group(s) to which they belong. The user is then detached from the organization but will continue to have a personal account in the system. You can check the groups the user belongs to through the Users section.
2.4. Managing Group Members
To manage group members:
Select a group and click on the three-dot menu from the Tools column.
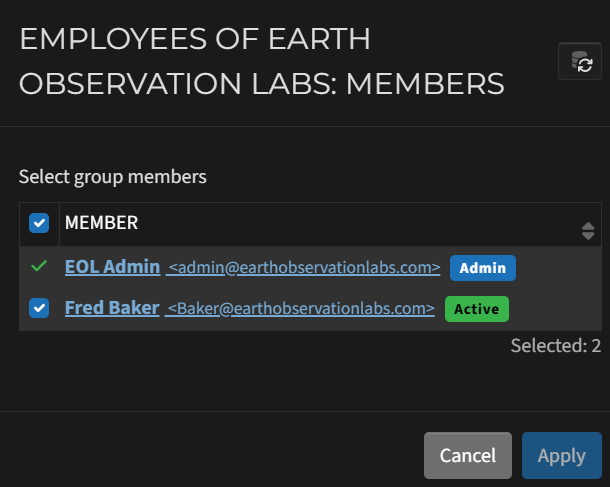
Select Members to manage group members.
A new view will open with a list of all of the organization's users.
Group members and their emails show as selected.
Search for a particular user by name or email address using the search bar.
Select/Deselect the user(s) you want to add/remove to/from the group.
Click Apply to save the changes.
A confirmation dialogue will appear with the list of members to be added/removed.
Review and confirm or decline this action.
2.5. Inviting Members To A Group
Users can be invited to an organization and group either individually or as a batch with a CSV.
2.5.1. Inviting A Single Member To A Group
To invite members to a group individually:
Select the group to which the user should be added and click on the three-dot menu from the Tools column.
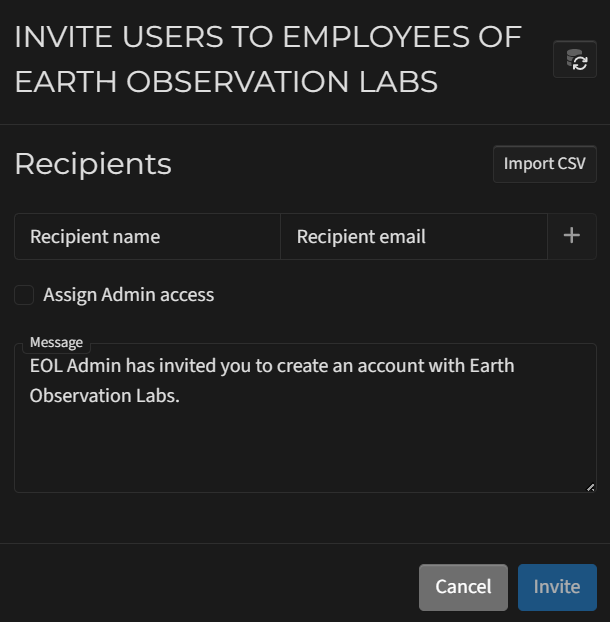
Select Send Invite.
A window opens where the following information is required:
Recipient email
Recipient name
Assign admin access option - allows you to assign that user OrgAdmin access
Personal message (optional)
Select Invite to send the invitation. Once the invitation has been accepted, the member will appear in the group's list of members. The status of invitations can be seen in the Invitations section in the left menu.
2.5.2 Inviting A List Of Members To A Group
To invite a list of members to a group:
Select the group to which the user should be added and click on the three-dot menu from the Tools column.
Select Send Invite.
A window opens, and you can click the Import button.
You will be prompted to select a CSV file.
The CSV file should contain 2 column headers on the first row to allow mapping of the data. The CSV file must contain values for the following data fields:
Name
Email
If the column mapping is not successful, you will be prompted to select the correct column mapping and resolve all other errors.
The following information is required:
Assign admin access option - allows you to assign OrgAdmin access to all users to be invited
Personal message (optional)
Select Invite to send the invitation. Once an invitation has been accepted, the members will appear in the group's list of members. The status of the invitation can be seen in the Invitations section in the left menu.
There are optional columns that can be displayed (through the Select Columns to Display button):
Display Name
Nickname
Professional Title
Phone Number
The top table navigation includes:
Reload data button
Invite button
Search bar
Select Columns to Display button
Reset defaults button
3.1. Inviting Members To An Organization
Users can be invited to an organization and group either individually or as a batch with a CSV.
3.1.1. Inviting A Single Member To An Organization
To invite members to an organization individually:
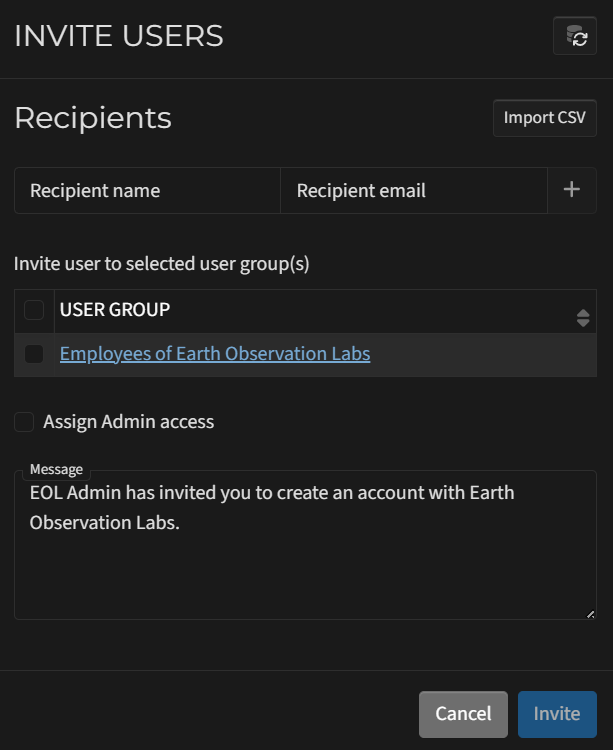
In the Users section, select the Invite button.
A window opens where the following information is required:
Recipient email
Recipient name
Group(s) to which they should be incited to. All licenses available to this group will be available for the user after the invitation is accepted.
Assign admin access option - allows you to assign that user OrgAdmin access
Personal message (optional)
Select Invite to send the invitation. Once the invitation has been accepted, the member will appear in the Users table. The status of invitations can be seen in the Invitations section in the left menu.
3.1.2. Inviting A List Of Members To A Group
To invite a list of members to a group:
Select the group to which the user should be added and click on the three-dot menu from the Tools column.
Select Send Invite.
A window opens, and you can click the Import button.
You will be prompted to select a CSV file.
The CSV file should contain 2 column headers on the first row to allow mapping of the data. The CSV file must contain values for the following data fields:
Name
Email
If the column mapping is not successful, you will be prompted to select the correct column mapping and resolve all other errors.
The following information is required:
Assign admin access option - allows you to assign OrgAdmin access to all users to be invited
Personal message (optional)
Select Invite to send the invitation. Once an invitation has been accepted, the member will appear in the group's table. The status of the invitation can be seen in the Invitations section in the left menu.
3.2. Viewing Profile Details
To view profile details:
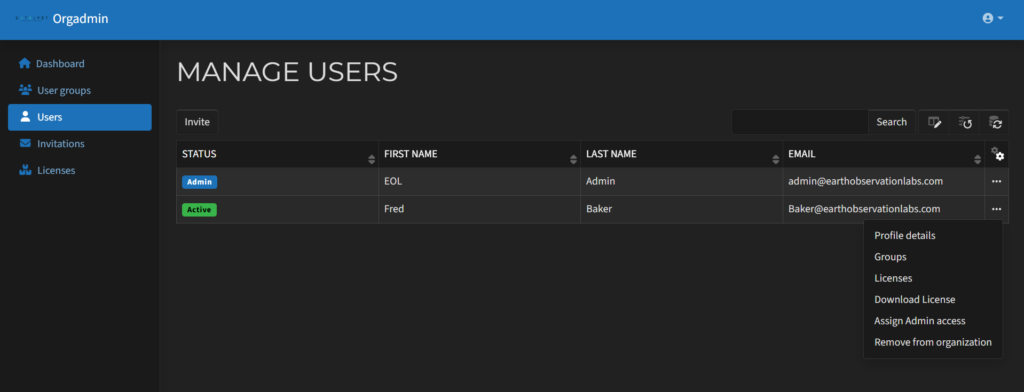
In the Users section, select a user and click on the three-dot menu from the Tools column.
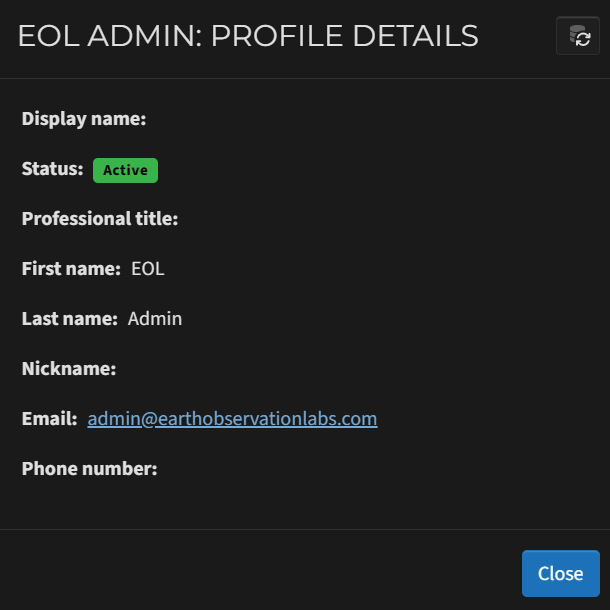
Select Profile Details to see further information about the user:
Display name
Status
Professional title
First name
Last name
Nickname
Email
Phone number
3.3. Managing User Groups
To manage user groups:
Select a user and click on the three-dot menu from the Tools column.
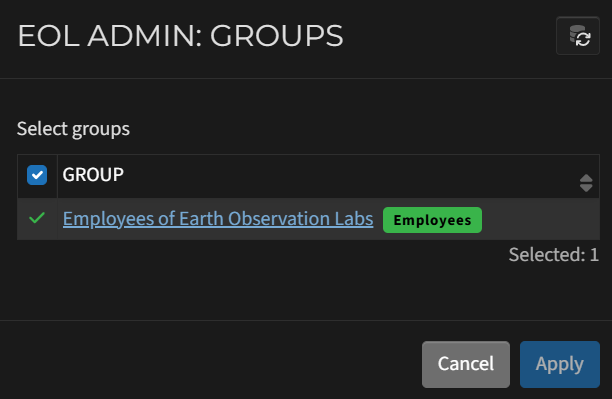
Select Groups to see further information about the groups that the user belongs to.
A new view will open with a list of all the organization's groups. All groups that the user belongs to are shown as selected.
Select/Deselect the group(s) you want to add/remove a particular user.
Select Apply.
A confirmation dialogue will appear with a list of groups you want to add or remove.
Review it and confirm or decline this action.
3.4. Managing User Licenses
To manage user licenses:
Select a user and click on the three-dot menu from the Tools column.
Select Licenses to see further information about user licenses.
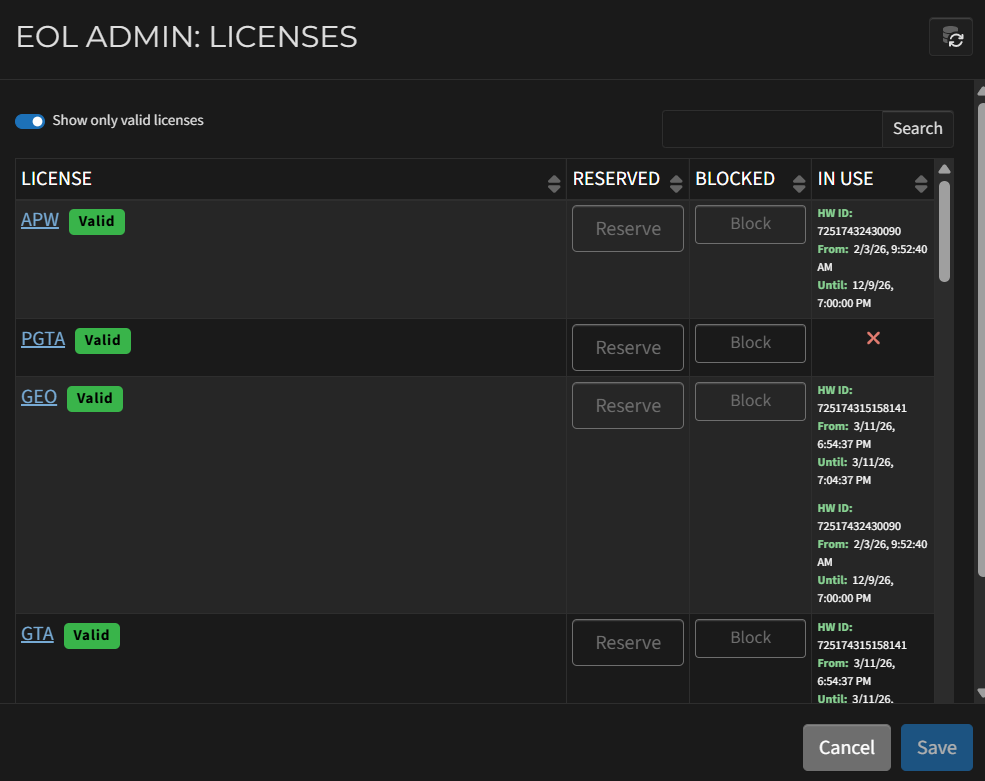
A new view will open with a list of license Items the user is entitled to use. The license table includes 4 columns: License, Reserved, Blocked and In Use.
Each license key can be expanded by clicking on the license name to reveal license details. To see more information, please see 5.1. Viewing License Details.
License keys can be reserved or blocked for the user
The In Use column provides details on the duration of the user's current session as well as the hardware ID of the computer using the license key.
3.5. Assigning/Unassigning Admin Access
To assign/unassign admin access:
Select a user and click on the three-dot menu from the Tools column.
Select Assign admin access.
Confirm the change.
3.6. Removing A User
To remove a user:
Select a user and click on the three-dot menu from the Tools column.
Select Remove from Organization.
Confirm the removal.
Note: When a user is removed from their organization, they will be detached from the organization, and you will not be able to manage this user. The user will not be able to use any of the licenses belonging to the organization, but will continue to have a personal account in the system.
The following actions can be performed through this page's menus:
Send Invitation
View Invitation Details
Resend Invitation
Remove/Revoke Invitation
4.1. Inviting A User
Inviting a member assumes the person to be invited does not have an existing user account in the system. For dialogue details, please refer to 3.1. Inviting Members To An Organization.
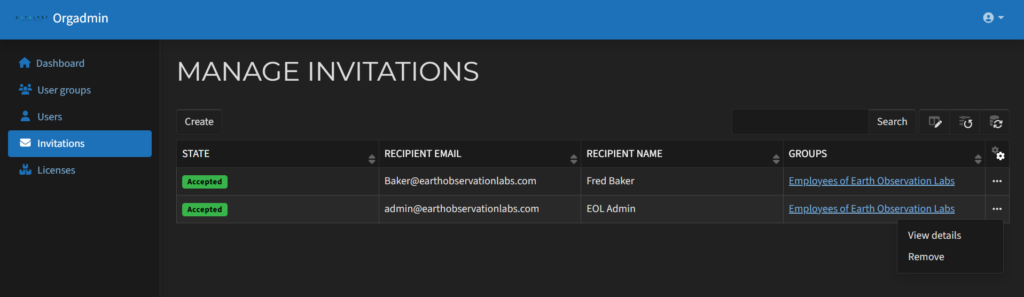
4.2. Viewing Invitation Details
To view invitation details:
In the Invitations section, select an invitation and click on the three-dot menu from the Tools column.
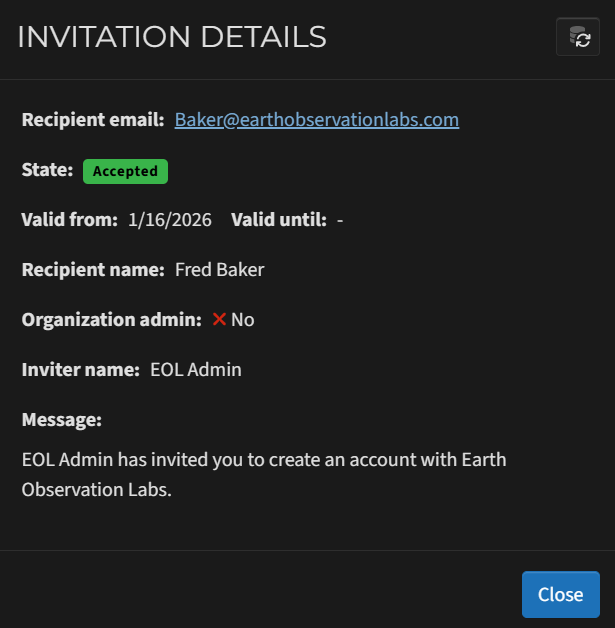
Select View Details to see further information about the invitation. The following details are shown:
Recipient email
State (Accepted, Pending, Declined or Unsent)
Recipient name
Admin access
Inviter name
Message
4.3. Resending Invitations
To resend an invitation:
Select an invitation that is pending or unsent, and click on the three-dot menu from the Tools column.
Select Resent to send the invitation.
Confirm the action.
4.4. Removing/Revoking Invitations
To remove/revoke an invitation:
Select an invitation, and click on the three-dot menu from the Tools column.
Select Remove to remove accepted or declined invitations from the table
Select Remove to revoke pending or unsent invitations. This action will prevent the user from becoming a part of the organization.
Confirm the action.
5. Licenses
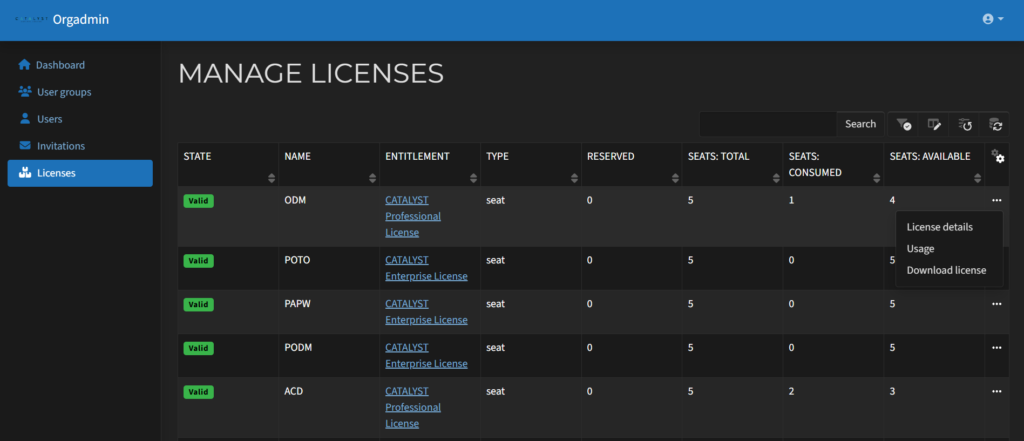
The OrgAdmin Licenses section offers a way to manage and check the status of the organization's licenses and seat reservations.
The top table navigation includes:
Search window
Select Columns to display button
Reset defaults button
Reload data button
The licenses table includes 9 default columns:
State - Valid, Expiring, Invalid, Deactivated
Name
Entitlement
Type
Seats: Total
Seats: Consumed
Seats: Available
Tools
There are several other optional columns that can be displayed through the Select Columns to Display button:
Valid From
Valid Until
Model
Use Count: Total
Use Count: Consumed
Use Count: Available
Use Time: Total
Use Time: Consumed
Use Time: Available
Allowed Versions
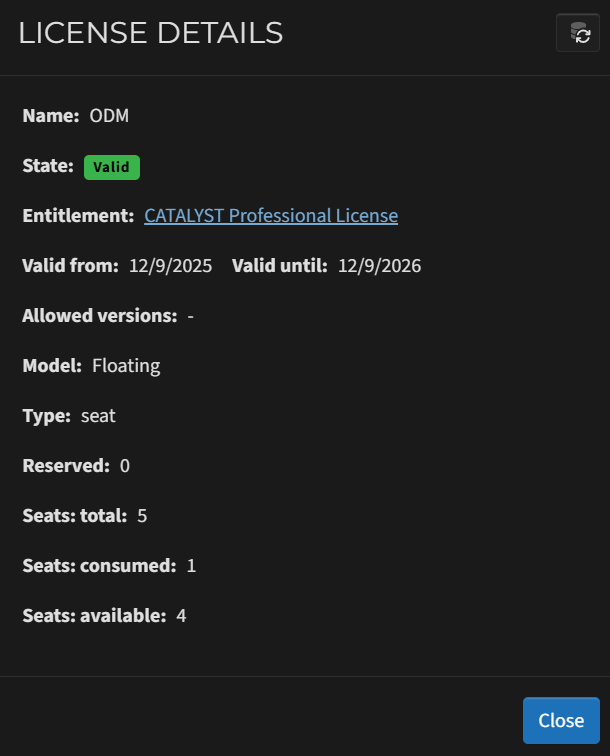
5.1. Viewing License Details
To view license details:
In the Licenses section, select a license item and click on the three-dot menu from the Tools column.
Select License Details to see further information about the license key. The details shown are:
Select a license item and click on the three-dot menu from the Tools column.
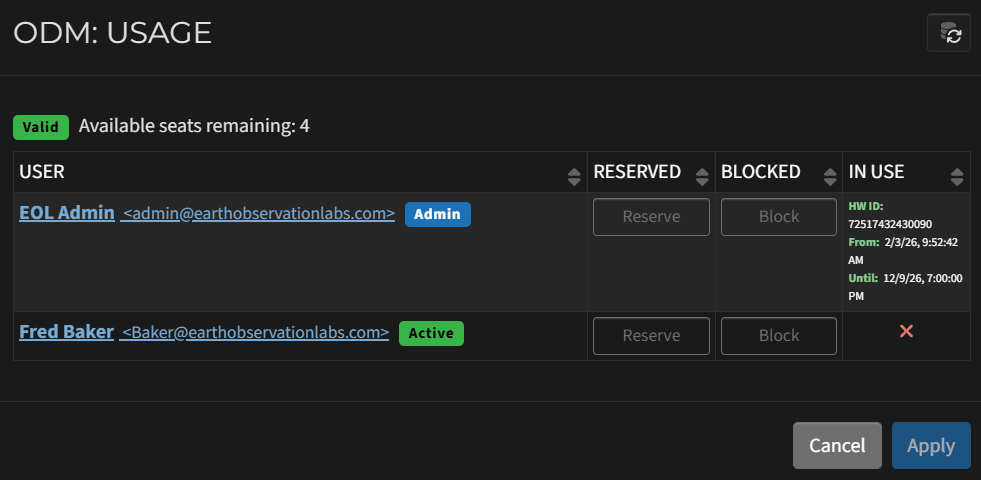
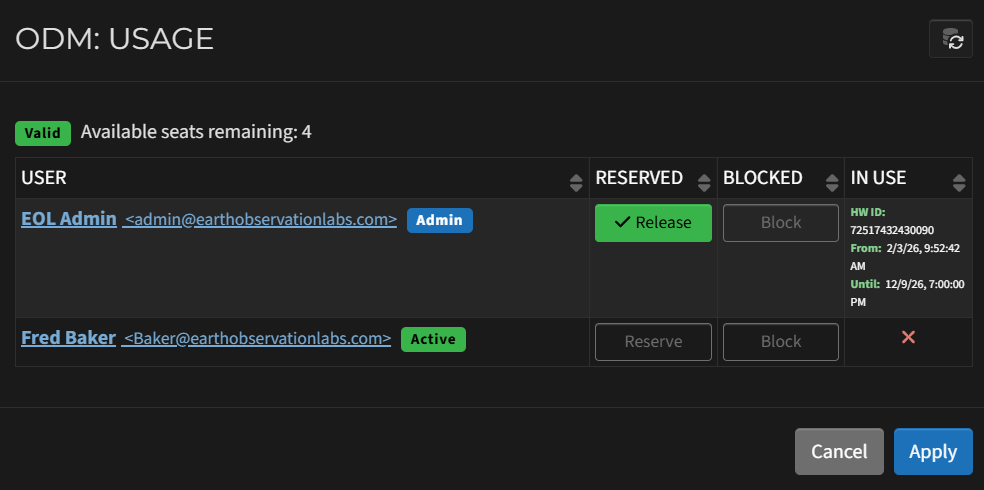
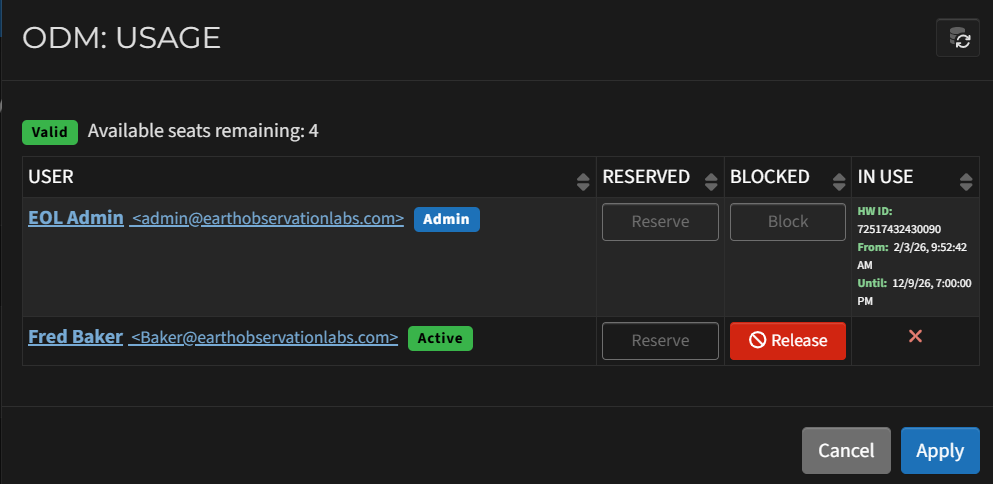
Select Usage. A window opens with a list of all users associated with the organization. The License Item Usage table consists of 4 columns - User, Reserved, Blocked and In Use.
Each user row includes a user name, user email and user status information
Each user can be expanded by clicking on the user name to reveal user details. You will be redirected to a new screen. To see more information, please see 3.2. Viewing Profile Details.
Select a user and click on the Reserve button to reserve a license seat for the user. The Reserve button will be highlighted in green and renamed to Release. Click on it to release the license key.
Select a user and click on the Block button to block a license seat for the user. After this, the button will be highlighted in red and renamed to Release. Click on it to release the seat.
In Use displays information on whether the license is consumed by the user at the moment. Consumed licenses will be shown as a green circle with a check mark.
Click Apply.
A confirmation dialogue will appear. Review it and confirm or decline this action.
Manage Cookie Consent
To provide the best experiences, we use technologies like cookies to store and/or access device information. Consenting to these technologies will allow us to process data such as browsing behaviour or unique IDs on this site. Not consenting or withdrawing consent, may adversely affect certain features and functions.
Functional
Always active
The technical storage or access is strictly necessary for the legitimate purpose of enabling the use of a specific service explicitly requested by the subscriber or user, or for the sole purpose of carrying out the transmission of a communication over an electronic communications network.
Preferences
The technical storage or access is necessary for the legitimate purpose of storing preferences that are not requested by the subscriber or user.
Statistics
The technical storage or access that is used exclusively for statistical purposes.The technical storage or access that is used exclusively for anonymous statistical purposes. Without a subpoena, voluntary compliance on the part of your Internet Service Provider, or additional records from a third party, information stored or retrieved for this purpose alone cannot usually be used to identify you.
Marketing
The technical storage or access is required to create user profiles to send advertising, or to track the user on a website or across several websites for similar marketing purposes.