Processing rasters by tiles is a crucial concept when creating custom processes that can be used on large files. This prevents hardcoding the tile dimensions, as that can degrade the performance or overwhelm memory resources. In some workflows, it is beneficial, and sometimes required, to process the image pieces in batches. This is achieved by accessing a particular subset of the raster, manipulating it, writing it, and then proceeding to the next subset until all the image pixels have been processed.
The scripts described in this tutorial can be found here - Tile Processing Scripts

The following are reasons and use cases for which tile processing would be advantageous.
This section shows how to process rasters by iterating over tiles/subsets of the input raster using Landsat-7 MS imagery. It will demonstrate how to read the blue and green channels using 256 x 256 tiles and output their sum to a file.
import os
import numpy as np
from pci.api import gobs, datasource as ds

# Set input and output files for workflow
working_dir = r'D:\Data\Tutorial\Python\Process_Tiles\proc_rasters_by_tiles'  # Set this path to the dir where you extracted the tutorial data
input_l7 = os.path.join(working_dir, 'l7_ms_tiled256.pix')
out_file = os.path.join(working_dir, 'landsat7_sum.pix')

# Open two datasets using the with-statement, one to read from and one to write to
with ds.open_dataset(input_l7) as read_dataset, ds.new_dataset(out_file, 'PCIDSK', '') as write_dataset:
    reader_l7 = ds.BasicReader(read_dataset, [1, 2])
    in_coord_sys = reader_l7.crs
    in_geocode = reader_l7.geocoding

    # Set tile size for reading
    reader_l7.tile_size = (256, 256)   # set to the desired tile size

    # Create the writer object
    writer = ds.BasicWriter(write_dataset)

    # Create output file
    writer_info = gobs.RasterInfo(reader_l7.width, reader_l7.height, 1, gobs.DT_16U) # Set bit-depth to accommodate pixel addition
    writer.create(writer_info)

    # Iterate through each tile, add the blue channel pixel values with the green channel and write to output
    for i, tile in enumerate(reader_l7, start=1):
        print('creating tile: {0} with dimensions: {1}'.format(i, writer.tile_size))

        # Store raster channels as numpy arrays and convert to 8bit Unsigned Integers
        blue_chan = tile.data[:, :, 0]
        green_chan = tile.data[:, :, 1]

        # Perform addition between blue and green channels and store results in sum_array
        sum_array = blue_chan + green_chan
        sum_array_16u = sum_array.astype(np.uint16)   # convert to 16-bit for output raster

        # Wrap array in a raster object (this doesn't make a copy of the data)
        sum_raster = gobs.array_to_raster(sum_array_16u, tile)

        # Write the pixels from sum_raster
        writer.write_raster(sum_raster)
        writer.crs = in_coord_sys
writer.geocoding = in_geocode 1 import os
2 import numpy as np
3 from pci.api import gobs, datasource as ds
4
5 # Set input and output files for workflow
6 working_dir = r'D:\Data\Tutorial\Python\Process_Tiles\proc_rasters_by_tiles' # Set this path to the dir where you extracted the tutorial data
7 input_l7 = os.path.join(working_dir, 'l7_ms_tiled256.pix')
8 out_file = os.path.join(working_dir, 'landsat7_sum.pix')
9The first step is to import the CATALYST Python API's modules, which will be called, and set up the variables that will point to the input and output file(s). In the code block above, line 2 is used to import numpy, which is an open-source library for storing and performing computations on large, complex arrays. The custom calculations are performed using this module.
Line 3 imports the gobs and datasource modules from the CATALYST Python API. These modules are used to read in and write out the raster pixels, geocoding information and coordinate system.
On line 6, working_dir is a variable that contains the path to the directory where the input data is stored.
10  # Open two datasets using the with-statement, one to read from and one to write to
11  with ds.open_dataset(input_l7) as read_dataset, ds.new_dataset(out_file, 'PCIDSK', '') as write_dataset:
12      reader_l7 = ds.BasicReader(read_dataset, [1, 2])
13      in_coord_sys = reader_l7.crs
14      in_geocode = reader_l7.geocoding
15
16      # Set tile size for reading
17      reader_l7.tile_size = (256, 256)   # set to the desired tile size
18
In this step, the Python with statement is used to open the input and create the output datasets, read in the first two channels, coordinate system and geocoding information, and define the tile size for processing.
On line 11, the with statement is used to call the ds.open_dataset() function and pass the input_l7 variable as its only argument, and use the as statement to refer to it as read_dataset in the following block. On the same line, the ds.new_dataset() function is also called (referred to as write_dataset in the following block), with the following arguments passed:
out_file as its first argument -> variable holding the path to the output file‘PCIDSK’ string as the second argument -> defines the file format ‘’ an empty string as the final argument -> defines file format options On line 12, an object called reader_l7 is created by calling ds.BasicReader() class initializer where the read_dataset variable is passed as the first argument , and the image channels to be read in, [1, 2] which represent the Blue and Green channels respectively, as the second argument. Lines 13 and 14 are used to get the coordinate system and geocoding information of the input file, which are assigned to in_coord_sys and in_geocode, respectively.
On line 17, the tile size is defined. This is used to read pixels from the input file and process them by defining the reader_l7.tile_size attribute. In this case, it's set to 256 x 256 pixels.
19  # Create the writer object
20      writer = ds.BasicWriter(write_dataset)
21
22  # Create output file
23      writer_info = gobs.RasterInfo(reader_l7.width, reader_l7.height, 1, gobs.DT_16U) # Set bit-depth to accommodate pixel addition
24      writer.create(writer_info)
25
On line 20, an object called writer is created using the ds.BasicWriter() initializer with write_dataset passed as the only argument. On line 23, the necessary information for creating the output file is defined by creating an object called writer_info by instantiating the class gobs.RasterInfo(). The arguments are as follows:
width defines the width of the file in pixelsheight defines the height of the file in pixels 1 is the number of channels in the output file DT_16U is the data type for the output channels Line 24 creates the output file by calling writer.create() with the output file information held in the writer_info object as its only argument.
26      # iterate through each tile, add the blue channel pixel values with the green channel and write to output
27      for i, tile in enumerate(reader_l7, start=1):
28          print('creating tile: {0} with dimensions: {1}'.format(i, writer.tile_size))
29
30          # store raster channels as numpy arrays and convert to 8bit Unsigned Integers
31          blue_chan = tile.data[:, :, 0]
32          green_chan = tile.data[:, :, 1]
33
34          # Perform addition between blue and green channels and store results in sum_array
35          sum_array = blue_chan + green_chan
36          sum_array_16u = sum_array.astype(np.uint16)   # convert to 16-bit for output raster
37
38          # wrap array in a raster object (this doesn't make a copy of the data)
39          sum_raster = gobs.array_to_raster(sum_array_16u, tile)
40
The iterative process is performed within a for loop. The for-loop is created on line 27, where each tile in reader_l7 is processed. Line 27 also creates a variable i and sets it to start at 1. This is used for illustrative purposes only to keep track of each iteration, as it will increment by 1 for each tile. It is not needed for the actual code.
On line 28, a print-statement prints the tile number and dimensions of the tile being processed. This is solely done to help illustrate the concept and is not required in the code.
The first element in tile is accessed on line 31 to represent the blue channel and is assigned to the blue_chan variable. The next line (line 32) does the same thing for the green channel.
Note: Instead of using astype(), consider using vectorize() to optimize performance.
Line 35 performs the addition calculation and assigns the resulting array to the sum_array variable. This variable is then converted from a numpy array to a 16-bit unsigned integer using astype() on line 36. This is according to the tutorial data type and should be changed according to the working dataset. That is, the tutorial adds two 8-bit unsigned raster channels, so the output channel should be at least 16-bit to avoid overflow and preserve full precision. This array is then wrapped into a raster object (sum_raster) using the gobs.array_to_raster() method. This method also has a RasterContext parameter, which represents information about the margin and position of a raster. This is important to use when processing tiles, as each tile has different margin and offset information. The loop variable, tile, can be used for this parameter as it's a Raster object which includes the raster info as well as the raster context.
The array is now formatted to be written to an output file by the CATALYST Python API.
Note: array_to_raster() does not copy the values and is optimized for performance.
41  # Write the pixels from sum_raster
42          writer.write_raster(sum_raster)
43          writer.crs = in_coord_sys
44          writer.geocoding = in_geocode
45
This step works to write the results of the addition to the output file, one tile at a time.
Line 42 calls the write_raster() method to write the pixel values from sum_raster to the output file held in the writer object. On lines 43 and 44, the coordinate system and geocoding information are obtained from the input file (held in the in_coord_sys and in_geocode variables from earlier) are written into the writer's crs and geocoding attributes.
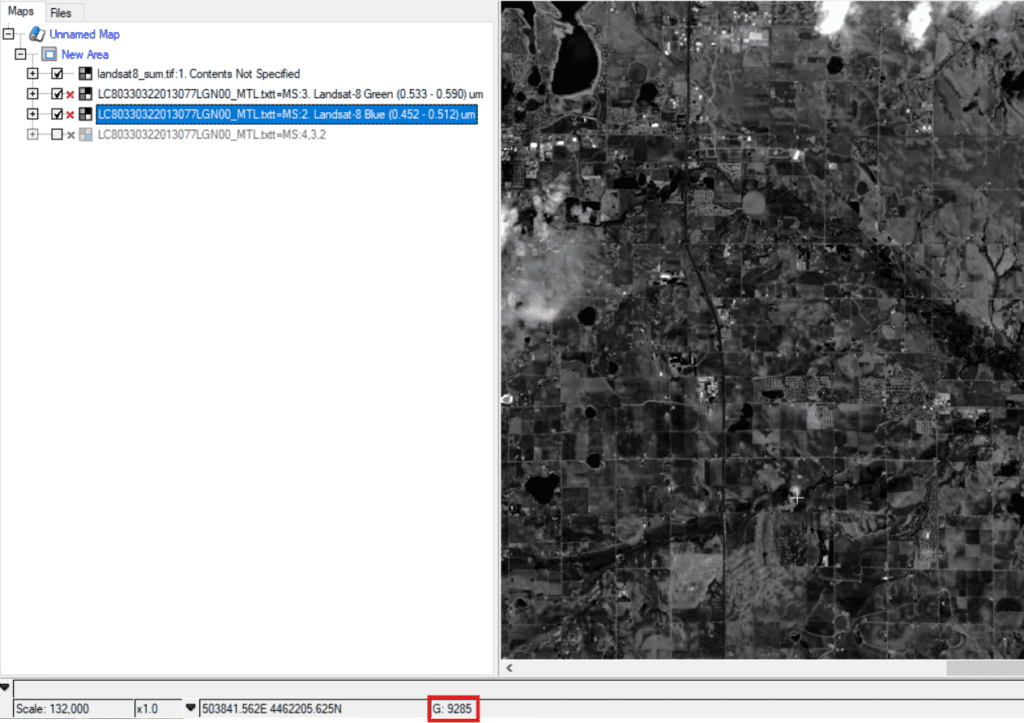
Once the code is done executing, the result will be a single output file called landsat7_sum.pix with the output results stored in channel 1.
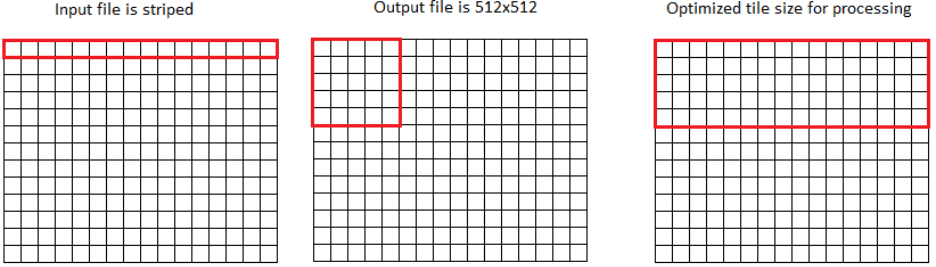
This section of the tutorial utilizes raw striped Landsat-8 imagery to demonstrate key concepts for optimizing throughput when processing with tiles.
The following concepts are essential to understand when processing rasters by tiles:
The code is divided into two main functions: the main() function, derived from the above section, is responsible for executing the primary program, and the get_tile_size() function calculates the optimal tile size for processing. Although this section of the tutorial focuses on the get_tile_size() function, the main() function will be referenced as it relates to it.
Note: The order of the script is import statements > get_tile_size() > main() > if __name__ == '__main__' statement
1    import os
2    import calendar
3    import time
4    import numpy as np
5    from pci.api import gobs, datasource as ds
6
This updated script adds Python's calendar and time packages (on lines 2 and 3) to derive the processing time and help illustrate the difference in time efficiency between using optimized and non-optimized tile dimensions.
111  if __name__ == '__main__':
112      # set input output files and processing parameters for workflow
113      working_dir = r'D:\tutorials\optimized_tile_processing'  # set this path to the dir with the input data
114      input_file = os.path.join(working_dir,
115                                'LC81950282015242LGN00\LC81950282015242LGN00_MTL.txt-MS')
116      output_file = os.path.join(working_dir, 'landsat8_sum.tif')
117      output_tile_size = 'TILED512'
118      memory_limit = 32   # in MegaBytes (MB)
119      overwrite = 'yes'
120
121      if overwrite == 'yes':
122          try:
123              os.remove(output_file)
124
125          except OSError:
126              pass
127
128      main(input_file, output_file, output_tile_size, memory_limit)  # run the main process
This block of code will live at the very bottom of the script and is used to define the input and output files, as well as the processing parameters. If the script is run as the primary process, that is, it's not imported by another file, this block will be initialized.
On line 111, if __name__ == ‘__main__’: tells Python to only run the block of code below it if this Python file is run as the main process.
Line 113 creates a string variable called working_dir, and sets it to the path where the raw input data is. On lines 114 and 116, the input file and the output file are set to the Landsat-8 key file and the output TIF file, respectively. Line 117 sets the tiling scheme that will be used when creating the output TIF file, which is set to 515 x 512 pixels. On line 118, the memory limit is defined as 32MB, which is quite small, but sufficient for this tutorial. Lines 121 to 126 create a simple rule for whether or not to overwrite the output file. Finally, online 128, the main() function is called and passes the input and output files, and processing variables as arguments.
main() Function50 def main(in_file, out_file, out_tile_size, mem_lim):
51 """
52 This function contains the main process for this workflow, which will process an image
53 by tiles, using optimal tile dimensions, computed by the get_tile_dimensions()
54 function.
55 :param in_file: path to input file for processing
56 :param out_file: path and name of output file for writing
57 :param out_tile_size: tiling method
58 :param mem_lim: user defined memory limit for determining optimal tile size
59 :return: none
60 """
61
62 # open two datasets using the with-statement, one to read from and one to write to
63 with ds.open_dataset(in_file) as read_dataset, ds.new_dataset(out_file, 'TIFF', out_tile_size) as write_dataset:
64 in_chans = [2, 3]
65 reader_l8 = ds.BasicReader(read_dataset, in_chans)
66 in_coord_sys = reader_l8.crs
67 in_geocode = reader_l8.geocoding
68 in_raster = reader_l8.read_raster(0, 0, reader_l8.width, reader_l8.height)
69
70 # create the writer object
71 writer = ds.BasicWriter(write_dataset)
72
73 # create output file
74 out_chan = 1
75 writer_info = gobs.RasterInfo(reader_l8.width, reader_l8.height,
76 out_chan, gobs.DT_32R) # Set bit-depth to accommodate pixel addition
77 writer.create(writer_info)
78
79 # get and set the optimal tile size
80 tile_sz_x, tile_sz_y = get_tile_size(reader_l8, writer, mem_lim,
81 len(in_chans), out_chan)
82 reader_l8.tile_size = (tile_sz_x, tile_sz_y)
83
84 start_time = calendar.timegm(time.gmtime())
84
86 # iterate through each tile, add the blue channel pixel values with the green channel and write to output
87 for i, tile in enumerate(reader_l8, start=1):
88 print('creating tile: {0} with dimensions: {1}'.format(i,reader_l8.tile_size))
89
90 # store raster channels as numpy arrays and convert to 32-bit real
91 blue_chan = in_raster.data[:, :, 0]
92 green_chan = in_raster.data[:, :, 1]
93
94 # Perform addition between blue and green channels and store results in sum_array
95 sum_array = blue_chan + green_chan
96 # convert to 32-bit for output raster
97 sum_array_32r = sum_array.astype(np.float32)
98
99 # wrap array in a raster object (this doesn't make a copy of the data)
100 sum_raster = gobs.array_to_raster(sum_array_32r)
101
102 # write the pixels from sum_raster, the input coordinate system and geocoding information to output file
103 writer.write_raster(sum_raster)
104 writer.crs = in_coord_sys
105 writer.geocoding = in_geocode
106
107 # Print out the processing time
108 proc_time = calendar.timegm(time.gmtime()) - start_time
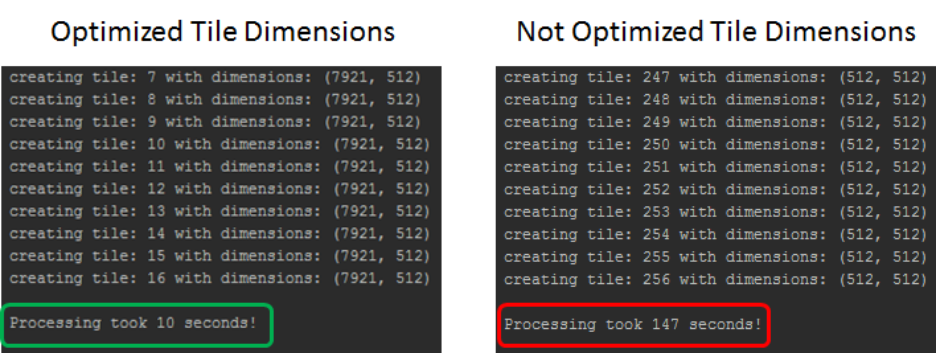
109 print('\nProcessing took {0} seconds!'.format(proc_time))
110The main() function holds the primary code for processing by tiles derived from the original script in the first part of this tutorial. Although it contains a few tweaks to accommodate Landsat-8 imagery, the general premise is the same, with the inclusion of a call to the get_tile_size() function to set the optimal tile size. These two functions will live between the import statements and the if __name__ == '__main__': sections.
The main() function takes in 4 arguments:
in_file - the input fileout_file - the output fileout_tile_size - the output tile sizemem_lim - the memory limitAlthough the get_tile_size() function has not been defined yet, it is called on line 80 and returns the optimal x and y tile sizes (tile_sz_x and tile_sz_y) based on the tiling schemes of the input and output data, as well as the user-defined memory limit.
get_tile_size()7 def get_tile_size(in_reader, out_writer, mem_lim, num_in_chans, num_out_chans):
8 """
9 This function determines the optimal tile dimensions for processing a file based
10 on the tile dimensions of the input file and output file
11 :param in_reader: the reader object that contains the tiling information for the input file
12 :param out_writer: the writer object that contains the tiling information for the output file
13 :param mem_lim: user defined memory limit in MB
14 :param num_in_chans: number of input channels that are being read in by the in_reader object
15 :param num_out_chans: number of output channels that are created by the out_writer object
16 :return: tile_size_x, tile_size_y
17 """
18
19 in_reader.set_optimal_tile_size()
20 out_writer.set_optimal_tile_size()
21
22 max_tile_x = max([in_reader.tile_size[0], out_writer.tile_size[0]])
23 max_tile_y = max([in_reader.tile_size[1], out_writer.tile_size[1]])
24 in_bytes = in_reader.datatype.bits_per_pixel / 8
25 out_bytes = out_writer.datatype.bits_per_pixel / 8
26 Before the main() function and below the import statements, the get_tile_size() function is created to compute the optimal tile size, in the x and y directions, based on the tiling scheme of the input and output files. The parameters passed to this function are as follows:
in_reader: the input reader object that contains tiling information about the input file to be processed.out_writer: the output writer object that contains tiling information about the output file that will be created.mem_lim: the user-defined memory limit. This sets the upper limit of how much memory can be used, which will define the maximum tile size.num_in_chans: the number of channels that will be read in during processing. This impacts memory usage.num_out_chans: the number of channels that will be written to the output file. This impacts memory usage.Lines 19 and 20 obtain the tile dimensions in the input and output files by calling the in_reader.set_optimal_tile_size() and out_writer.set_optimal_tile_size() methods. Lines 22 and 23 then get the largest tile size in each direction between the files. This is essential as the processing tile size should be equal to or larger than the largest size in each direction, as long as it meets the memory limit.
On lines 24 and 25, the bit-depth of the input and output channels is obtained (in bytes) through the in_reader.datatype.bits_per_pixel and out_writer.datatype.bits_per_pixel properties. This information is stored in the in_bytes and out_bytes variables and is used to calculate the memory requirements for the optimal tile size.
27       mem_req_bytes = max_tile_x * max_tile_y * ((num_in_chans * in_bytes) +
28                                                  (num_out_chans * out_bytes))
29       mem_req_megabytes = mem_req_bytes / 1048576.0
30
Using the information about the input/output tile size in each direction, the number of channels and the bit depth of each channel, the amount of memory required for processing the tiles can be calculated. This is done on lines 27 & 28, where the result is in bytes. Line 29 converts the required memory from bytes to megabytes (MB) so it can be compared to the user-defined memory limit.
31   if mem_lim > mem_req_megabytes:
32       print('\n$$$$$$$$$ Optimal tile size meets memory limit $$$$$$$$$')
33       print('The memory limit of: {0} is greater than the memory required' \
34             'for optimal tiling of: {1}\n'.format(mem_lim, mem_req_megabytes))
35
36       tile_size_x = max_tile_x
37       tile_size_y = max_tile_y
38
39   else:
40       # you can be more creative in creating a dynamic solution to lowering the tile size to meet your memory limit
41       print('\n$$$$$$$$$ Optimal tile size exceeds memory limit $$$$$$$$$')
42       print('The memory limit of: {0} is less than the memory required' \
43             'for optimal tiling of: {1}\n'.format(mem_lim, mem_req_megabytes))
44
45       tile_size_x = 512
46       tile_size_y = 512
47
48   return tile_size_x, tile_size_y
49
On line 31, the memory limit (mem_lim) is checked to see if it's greater than the required memory (mem_req_megabytes). If it is true, then the x and y tile sizes (tile_size_x and tile_size_y) are set to the max tile sizes (max_tile_x and max_tile_y) - the optimized tile sizes (lines 36 and 37). If the memory limit is much bigger than the required memory, rules to further increase the tile size should be created. As a general rule, the largest tile size possible should be used.
Note: Further optimizations should be done here.
The else-condition on line 39 is used to handle the case where the optimal tile size would require more memory than the user-defined limit. In the case of this tutorial, the tile size is set to 512 pixels.
Note: Hardcoding a tile size is not recommended, but was done to keep this tutorial relatively simple.
Finally, on line 48, the tile size variables, tile_size_x and tile_size_y, are returned to be used in the main() function for processing.
As explained earlier, the function of the script is to illustrate iterative raster tile processing by calculating the addition of the Blue and Green channels, and writing the pixel sums to a new file.