To run a batch classification, first classify an individual image that you want to use as reference for the batch you want to process; that is, run Segmentation, Attribute Calculation, and Supervised Classification. You can also, in addition to the supervised classification, define and run one or more rule-based classifications to further refine the classification, overall.
When you are satisfied with the results, you can run a batch classification on several images to apply the same classification to each. The batch classification applies the segmentation, attribute calculation, supervised classification, and any rule-based classifications that you select.
If necessary, you can add more than one batch classification to the process canvas. The configuration of each can be the same or different. Each additional batch classification you add is incremented numerically. For example, the first is named Batch Classification, the second Batch Classification(2), the third Batch Classification(3), and so forth.
When you right-click a process to add to a batch classification, such as a segmentation process, the name of each batch classification is available to select on the menu, as shown in the following figure.

Training-model file
In the following procedure you will add a supervised classification to use with the batch classification. If the supervised classification has an associated training-model file, and you want to use the model in the batch classification, under Training Model, you need not enter a file name in the File box: the training model associated with the supervised classification will be added to the batch when you add the supervised classification.
However, if the supervised classification does not have an associated model file, you must first rerun Supervised Classification on the reference image with the operation configured to create the model file, and then add it to the Process Canvas box. Alternatively, you can enter the name of another model file you want to use.
For example, in the following figure, the supervised classification has an associated training model file.

In the preceding scenario, therefore, under Training Model, you need not specify a file name in the File box.
To set up and run a batch classification
-
In the Object Analyst window, using a reference image as the source, run Segmentation, Attribute Calculation, Supervised Classification (including creation of a training-model file), and, optionally, at least one Rule-Based Classification on the image, adding each operation to the Process Canvas box.
The contents of the Process Canvas box will look similar to the following figure.

-
In the list under Operation, select Batch Classification.
The display is refreshed to show the settings for a batch classification.
-
Do the following:
-
Under Input Images, type the path and name of the folder containing the images you want to classify as a batch or, to select a folder, click Browse.
After you select the folder, if necessary, in the Search pattern box, type a value by which to filter the contents of the folder. For example, by default, the value *.pix is used to select only PCIDSK files in the folder.
-
Under Output, in the Folder box, type the path and name of the folder to which to write the output batch-classified files or, to select a folder, click Browse.
After you enter the folder, if necessary, in the Prefix box, type a prefix to use to add to the names of the output files. For example, by default, each output file is prefixed with Seg_.
-
If necessary, under Training Model, in the File box, type the name of the training-model file to use with the batch-classification process or, to select a folder, click Browse.
That is, if the supervised classification you intend to add to the batch classification later in this procedure already has an associated training-model file, you need not enter a file name in the Training Model box.
-
Under Input Images, type the path and name of the folder containing the images you want to classify as a batch or, to select a folder, click Browse.
-
To add the batch classification to the Process Canvas box, click Add.
A Batch Classification process is added to the canvas similar to that shown in the following figure.
 Notice that under Batch Classification, the Training Model, Segmentation, Attribute Calculation, and SVM Classification items are each displayed in red. This is to indicate that you must complete the definition of each before you can run the batch classification.Note: When you add a segmentation process to the batch that has an associated training-model file, the Training Model item will be updated automatically.
 -
In the Process Canvas box, right-click the existing segmentation process that you want to use, point to Add To, and then click the batch classification to which you want to add the segmentation.
Tip: You can also drag a process to the corresponding one in the batch classification.
The Batch Classification process is updated with the segmentation you added, as shown in the following figure.

-
Repeat the previous step, but instead right-click the existing attribute calculation that you want to use, and then do the same to add the existing SVM classification you want to use.
That is, repeat the step until you have replaced each item appearing in red with an actual corresponding process. After you do so, the items under Batch Classification will appear similar to those shown in the following figure.

-
If you have a rule-based classification you want to add to the batch, in the Process Canvas box, right-click the existing rule-based classification that you want, point to Add To, and then click the batch classification to which you want to add it.
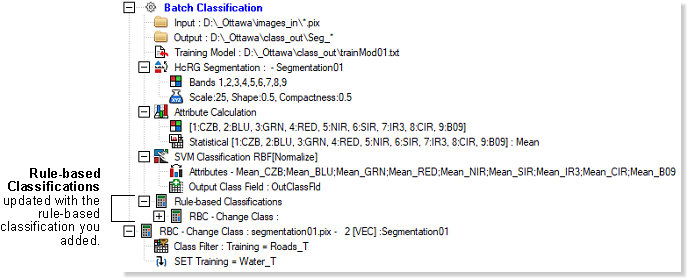
After you do so, Rule-based Classifications is updated with the rule-based classification you selected, and will appear in the batch classification similar to that shown in the following figure.
-
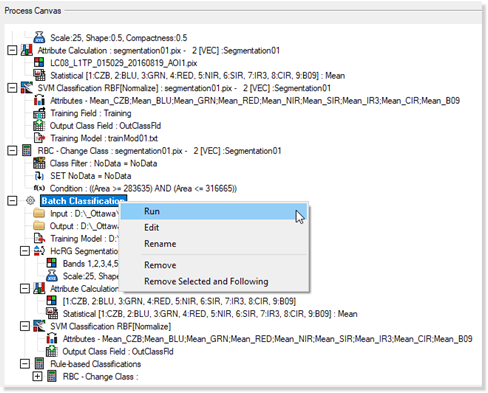
Right-click Batch Classification, and then click Run.
A window is displayed, showing the progress of processing each operation of the batch on each image.