With Attribute Calculation, you calculate various attributes for each object (polygon segment).
To set up and run Attribute Calculation
-
In the Object Analyst window, in the list under Operation, select Attribute Calculation.
The display is refreshed to show the settings for attribute calculation.
-
Under Source Channels, click Select, and then in the Layer Selection window, do the following:
-
In the File box, type or select the file you want.
If the file you want does not appear in the list, click Browse, and then select the file you want.
-
In the Select column of the table, click the row of each layer you want.
To select all the available layers, click Select All. A check mark appears in the Select column for each layer you select.
-
If necessary, you can also enter a new alias for a layer in the Band Alias column.
Note: The corresponding field name in the attribute table will be appended with the alias you specify.
- Click OK.
-
In the File box, type or select the file you want.
-
Under Segmented Vector Layer, click Select, and then in the Layer Selection window, do the following:
-
In the File box, type or select the file you want.
If the file you want does not appear in the list, click Browse, and then select the file you want.
-
n the Select column of the table, click the row of the layer you want.
A check mark appears in the Select column for the layer you select.
- Click OK.
-
In the File box, type or select the file you want.
-
Under Attributes to Calculate, do the following, as applicable:
- To calculate channel statistics based on pure pixels, select the Also Compute pure pixel statistics check box.
When you select this check box, the field name will be appended with _PP_ to indicate it is pure-pixel statistics.
- In the unlabeled box below, select a check box beside each attribute you want to calculate.
That is, you can select the check box beside Statistical, Geometrical, Vegetation Indices, Texture, or Polarimetric SAR, as applicable. If you want to calculate attributes on a subset of any of the preceding, expand the item, and then select the check box beside each item you want. For example, you can expand Statistical, and then select only the Mean check box or the Standard deviation check box.

With the Vegetation Indices check box, you can, if necessary, modify the spectral bands: right-click the Vegetation Indices check box, and then click Modify Spectral Bands.
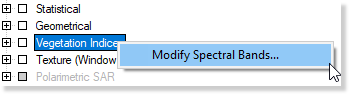
For information about the Modify Spectral Bands window, see Modifying spectral bands.
With the Texture check box, you can select the size of the filter window you want to use: right-click the Texture check box, and then click the size you want. You can select a size ranging from 3 x 3 through 35 x 35.
For each selected check box, a corresponding field will be added to the attribute table, which you can view in Attribute Manager.
- To calculate channel statistics based on pure pixels, select the Also Compute pure pixel statistics check box.
-
Do one of the following:
- To add the operation to the Process Canvas box, click Add.
- To add the operation to the canvas and run the process, click Add and Run.