This topic discusses the general workflow of creating a quality mosaic.
New Project wizard
- In Mosaic Tool, create a new project by clicking New Project on the File menu or clicking New Project on the Project toolbar.
- In OrthoEngine, with Mosaic selected in the Processing step list, initiate generation of a mosaic by clicking Mosaicking.
If the OrthoEngine project has mosaic-preparation information defined, the wizard does not display and the images to be mosaicked are imported and displayed in Mosaic Tool. You must then define the output mosaic and you can either retain the mosaic-preparation information as specified in the OrthoEngine project or modify the information in Mosaic Tool.
If the OrthoEngine project consists of only orthorectified imagery, the wizard is displayed, in which you define the mosaicking details.
Manual workflow
This workflow also uses the New Project Wizard; however, after you add the source images you want and complete the mosaic definition, click Finish, and then in the Mosaic Tool window, you can manually add and compute cutines, apply normalization, color balancing, and more. Save your project, and when you do, you will be prompted to (re)generate the mosaic preview (even if you have not done so already). You must regenerate the preview to see the results of any changes you made.
After your manually prepare your images for mosaicking, you can then add one or more to the output mosaic. When you save the project, a message appears (by default), prompting you to regenerate the mosaic preview (even if you have not sone so already) and, effectively, generate the mosaic.
Steps of manual workflow
- Select the orthorectified images you want
It is good practice to first review your orthorectified images to determine which ones are best. Ideally, you want images that fully cover the area of interest (AOI). You can review your orthorectified images by opening each in Mosaic Tool and, if necessary, modify one or more to suit.
Some important points to consider when selecting images:- Use only one image per area, because more than one may adversely affect the ability to perform automatic color balancing. If you have more than one image over a particular area, such as a satellite stack, for example, then select only the best one.
- If you do not have a clear scene for an area, use multiple images, such as, for example, two scenes with cloud cover; however, you must manually adjust the cutlines to reduce or eliminate the cloud cover.
- Preparing the imagery for mosaicking
After you select the orthorectified images, you must then prepare them for mosaicking. Preparing a mosaic is to perform color balancing, generate cutlines, and, if necessary, apply image normalization.
For information about preparing your mosaic, see Setting up mosaic preparation
- Evaluate the preview image created after preparing the mosaic
In the misc subfolder of your project, open and review the <project_name>_mosaic_preview.pix file. If the quality is unsatisfactory, consider doing one or more of the following:
- Make significant adjustments to the mosaic to achieve a suitable level of quality. For information on how to manually modify the mosaic, proceed to step 4.
- Consider redoing step 1 by using alternative images of possibly better initial quality.
- Open the Mosaic Preparation window, and try using different settings. For example, if you first ran the process with the default settings, consider using custom settings instead.
- Manually adjust the mosaic in Mosaic Tool
In Mosaic Tool, adjust the cutlines, and then adjust the color balance of the image or images. Save the changes.
- Revaluate the preview image created after preparing the mosaic
After completing steps 3 through 4, as applicable, review the <project_name>_mosaic_preview.pix file again. If necessary, repeat step 4 and make additional adjustments to the mosaic.
- Generate the full-resolution mosaic
When you are satisfied with the color-balancing results and editing in your <project_name>_mosaic_preview.pix file, you can generate the full-resolution mosaic in a single tile.
Alternatively, you can generate the mosaic in multiple tiles or as defined by polygons.
- Desaturate the mosaic tile or tiles
In EASI, run the DESATUR algorithm to desaturate the overly bright areas to create the best-looking mosaic.
- Create a lookup table of custom enhancements (optional)
If you intend to generate pre-enhanced tiles as an end product, you can use the enhancement tools in Focus to create and save the lookup table (LUT) for reuse.
- Apply LUT-enhancement to the tile or tiles (optional)
You can apply the LUTs created in step 8 to the individual tiles, if necessary. In EASI, run the LUT algorithm to apply a LUT to each tile individually, and then run the FEXPORT algorithm to change the file format and bit depth.
- Post-edit the tiles
In Focus, further edit the tiles using the Smart GeoFill and DEM Editing features. Do post-editing fix-ups, such as fixing bridges and buildings, on individual tiles.
Additional tips for manual mosaicking
The following are generally recommended practices that will help you create a quality mosaic.
Do global image adjustments first
Review the mosaic, observing images or groups thereof that appear too light or too dark. Adjust these first; you need not alter dodging points at this time. Your primary goal is to achieve a satisfactory overall brightness of the mosaic before attempting fine edits on individual images. That is, adjust the big picture before focusing on the details.
Start with the best-quality images, select an enhancement, and then see the process through to completion
Enhance the mosaic or area of interest (AOI) thereof before you start. Select the best-quality images, and then match others to them. Be cautious when zooming in to an area, and then re-enhancing the data, because it may lead to a false conclusion: an inferior image may now appear superior to an image of good-to-high quality. It is important to maintain an overall perspective of the general image quality.
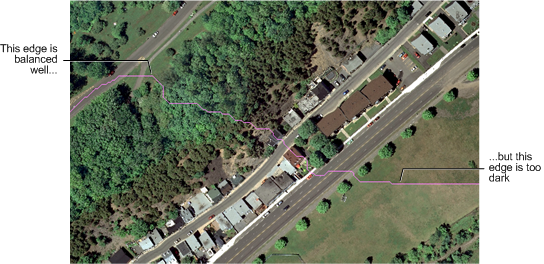
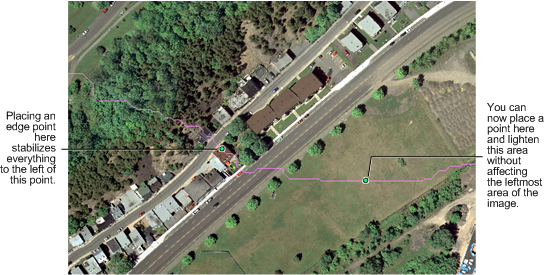
Working with difficult edges
Edges can often appear satisfactory using a single dodging point generated automatically; however, some may require you to manually add multiple dodging points. Try adjusting a dodging point until the edge is no longer visible, and then proceed along the line to where the edge starts to appear visible again. Add a new edge dodging point at that location, and then a second further along where you see a noticeable difference. Adjust the dodging point nearest to this location until the difference is no longer apparent, and then further along the line, as applicable.
Use floating dodging points to adjust locally bright or dark areas
- Add a ring of dodging points around the AOI, but in locations where you do not necessarily want change to occur. Do not adjust these dodging points. You add them here to stabilize the area so the changes do not spread outward in the entire image.
Figure 3. Using a ring of edge points as stabilizers
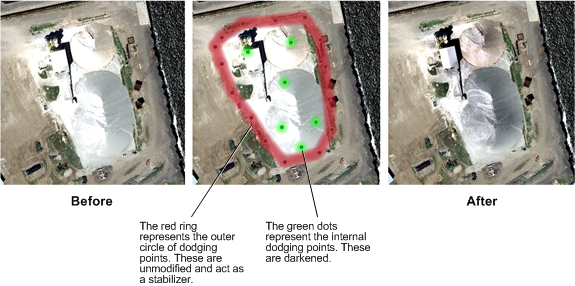
- Scatter dodging points inside the ring throughout the AOI. It is these dodging points you will adjust.
- Next, select the dodging points inside the ring as one or more groups (grouping provides a more uniform result). Adjust the brightness of each group or selection of groups individually. Some dodging points or groups thereof may require more adjustment than others.