To set up point thinning, you select the type of points you want to thin, how you want to dispose of the points designated for removal, and then define the grid by which to divide the image into cells. By defining the grid, you can specify the how many points you want to retain in each cell.
To set up point thinning
- Under the Thin Points check box, beside Points, click the type of points you want to thin: GCPs, TPs, or Both.
-
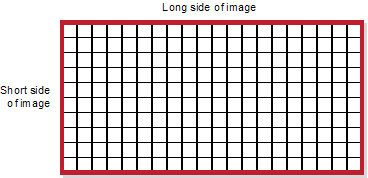
In the Number of cells on short side of each image box, type or select the number of cells on the short side of each image.
For example, with an image that has an aspect ratio of two to one (2:1), and you want to indicate that the short side has 10 cells (and, therefore, the long side has 20 cells), enter 10. That is, the image has 200 cells.
-
In the Maximum points per cell box, type or select the number of points to retain in each cell.
That is, the value is used in conjunction with the value of Number of cells on short side of each image to determine how many points to retain per cell.
-
Click the Thinning action list, and then click one of the following according to how you want to dispose of the points removed:
- To designate removed points as inactive, click Deactivate.
- To permanently remove the points from the project, click Delete.
-
Do one of the following:
- To run only the thinning process, proceed to Running thinning, refinement, or both and results.
- If you want to set up (and run) refinement immediately after thinning, proceed to Setting up point refinement.