A task performed commonly is to repair one or more areas of a mosaic. For example, bridges and overpasses are often areas of difficulty.
With a mosaic, an overlapping image that has a corresponding difficulty-free area can often be used in a repair. By using a set of overlapping images, either in a custom or project file set, you can select an image that may resolve the difficulty.
To repair a mosaic from overlapping imagery
- Zoom, pan, or both, as necessary to the AOI you want to repair, and then open Smart GeoFill.
- On the toolbar of the Smart GeoFill window, click Selection Mode.
-
In the Source list, select Custom File Set, and then in File Selector, select the files you want to use to repair the mosaic.
That is, open a set of orthorectified images that overlap the area you want to repair.
-
On the toolbar, click Selection Mode, and then in the viewer, draw a polygon around the area you want.
Notice that after you close the polygon, the polygon is filled with the pixels from the first overlapping image in your source file set. On the toolbar, you can click Previous and Next to cycle through the available overlapping images, and the interior of the polygon displays the overlapping area of each. If necessary, you can refine the selection of images you want to use in the Source File Set window. For more information about working with the images in your file set, see Working with a source file set.
-
Click Previous or Next, as applicable, to cycle through the available overlapping images to find an orthorectified image that will suit the repair.
Tip: You can also press Ctrl+F for Next or Ctrl+D for Previous. To exclude an unsuitable image, press Ctrl+E.
-
To achieve a smoother blend between the mosaic and the selected orthorectified image, select the Blend width check box, and then type or select a value in the box to the right.
You can also set the blend width before you draw the polygon or anytime the polygon is active.
-
On the toolbar, click Show Selection Edge (to hide the selection edge), and then verify the suitability of the blend between the inside and outside of the polygon.
You can further adjust the blend width to suit. If necessary, you can also adjust the color balancing or exposure correction to match the inside of the polygon to the outside.
-
After you are satisfied with the repair, including the blend width, color balancing, and exposure correction, on the toolbar, click Paste.
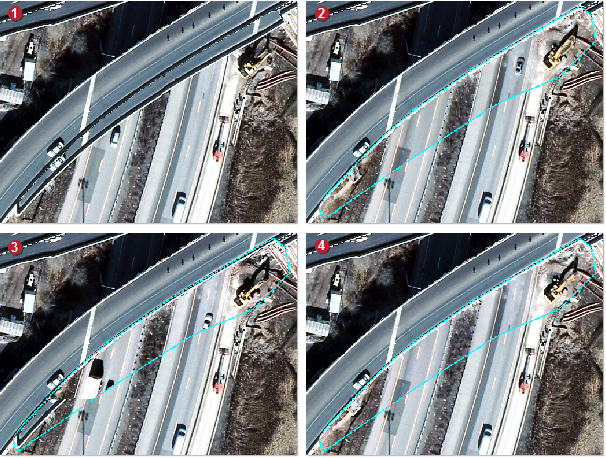
In the preceding figure, image 1 shows the overpass to be repaired. Image 2 shows the first overlapping image, which, while could be used, is deemed unsuitable, because the roadways do not align well enough. Image 3 shows the second overlapping image, which is also unsuitable due to residue of the bridge edge and vehicular traffic. Image 4 is deemed suitable, because the bridge repair is adequate and the roadways align well.