- A list, in which you select an item.
- A check box, which you select or clear.
- A text box, in which you type information.
You will notice that some parameters appear unavailable, or dimmed. To make the associated parameters available, you must enter or select information in the available list, check box, or box that precedes the unavailable ones.
The benefit of having unavailable parameters is that it minimizes distractions and you enter information quickly and efficiently, particulary if you use the Tab key to move the focus from one parameter to the next. That is, the system "guides" you to what information you need to enter and where to enter it. The system also guides you from parameters in which you do not have to enter any information.
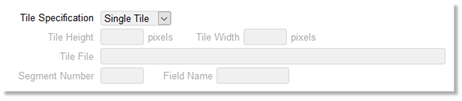
For example, when you create a job in the Mosaic Generation module, under Tile Options, notice the Tile Specification list in Figure 1. By default, Single Tile is selected. Notice that the Tile Height, Tile Width, Tile File, Segment Number, and Field Name boxes are unavailable. This is because, with Single Tile selected, you need not enter any additional information.
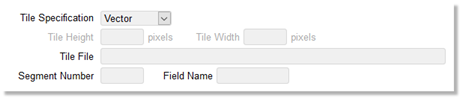
The availability or unavailabilty of associated parameters can vary according to a selection. For example, in Figure 2, notice that Tile Specification now has Vector selected. Notice, too, that the Tile File, Segment Number, and Field Name boxes are now available, prompting you to enter information in each.
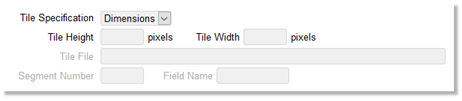
In Figure 3, Tile Specification has Dimensions selected. Notice that the Tile Height and Tile Width boxes are now available, prompting you to enter the tile height and width, respectively.
In Figure 4, Tile Specification has Script File selected. Notice that the Tile File box is available, prompting you to enter a file name.

Together, Figure 5 and Figure 6 show an example of an unavailable parameter with a check box, and how selecting the check box activates the unavailable parameter.

After you select the Send Email check box, the Email Addresses box is available, and you can then enter the address of each recipient.

Sometimes, you will need to enter information in a text box to make an associated parameter available. For example, in Figure 7, you must enter a file name in the Area of Interest File box to make the Crop Tiles to AOI check box available, perhaps to clear it.

The check box becomes available after you enter a file name in the text box, and then press the Tab key or click anywhere in the interface.
